Redirection plugin and redirect loops

On many of our sites, we use a plugin called Redirection. You can find it at Plugins > Redirection.

It enables you to easily redirect one URL to another. There is a screen from which you can create new redirect commands and edit existing ones. That screen is at Tools > Redirection.

That first screen is the “create new” screen. To see what you already have, click on the Groups link. That brings up a list of redirection groups. Normally there are two groups: Redirections and Modified Posts.

The good news is that the plugin automatically creates one of these entries in the “Modified Posts” group if you modify the URL that reaches a page or post. So, for example, if you changed “sample-page” to “example-page”, it automatically creates a redirection.

The bad news is that you can create a redirect loop. If somebody changes the URL from “example-page” back to “sample-page”, that will create another redirect entry. Then you will get a “server error” that says that the server noticied that “sample-page” was being redirected to “example-page” and then “example-page” to “sample-page” and then … forever.

The fix is to go to Tools > Redirection >> Groups >> Modified Posts. That has the list of all of the redirections that have been created when this kind of change happens. Use the search box on that page to find only the ones you’re interested in. Then delete any of them that are redirecting away from the page you want the visitor to see.

The automatic creation of redirects feature is a very useful one. Most of the time it works very nicely. But you do have to be careful to stay out of loops or know how to fix the problem when it appears.

Things To Know About The Black WordPress Toolbar

The black WordPress toolbar is a place where you can quickly find and navigate to different locations on your website—no matter what page you’re actually on. For example, you can quickly start a new post from the Settings Page or edit the Page that you’re currently viewing. The Toolbar, as WordPress calls it, is just a convenient way to access some of the wide range of features that WordPress provides.

Location Of The Toolbar

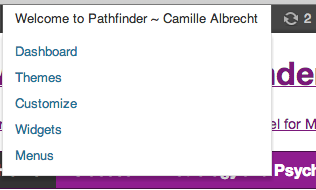
WordPress Toolbar Overview

The Toolbar is always present at the top of every page in the backend. The backend is the part of WordPress that normal visitors don’t see. It’s where you can edit posts or add plugins. For registered users who are logged into WordPress, the Toolbar will also be available in the frontend of the site. The frontend of WordPress is the part of your website that visitors can see. It’s where published Pages and Posts appear. The Toolbar is only ever visible to users who are logged in. Since the Toolbar contains lots of shortcuts, it’s useful to have it around everywhere.

Anatomy Of The Toolbar

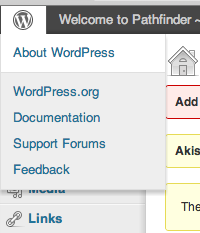
Toolbar's WordPress Menu

The WordPress logo menu contains various links to more information about WordPress itself. Some useful links here might be Documentation and Support Forums.

Toolbar's Website Menu

The website menu displays different options depending on whether you’re in the backend or the frontend. In the backend, this menu will take you to the frontend of the site. If you’re already in the frontend, then this menu will return you to the backend.

Toolbar's Update Menu

The update menu item lets you see at a quick glance whether or not anything needs updating.

Toolbar's Comment Menu

The comments menu item shows how many comments are currently awaiting moderation.

Toolbar's Comment Menu

The New menu is a way to quickly start a new post or upload new media, among other things, from anywhere.

Toolbar's Edit and ViewPost Menu Item

Following the New menu is the View Post or Edit Post menu item. When you’re editing a post, this item will read, View Post. This allows you to see what the post looks like in the frontend. When you’re looking at Post in the frontend, this will read, Edit Post. Clicking this menu item will allow you to easily edit the Post that you’re currently looking at. This is really useful if you’re having a hard time finding a post in the backend, but can easily find it in the front end.

Add Links To Publications

There are a few different types of links you can add to Posts or Pages. The first type is an external link, which points to something outside of your website. Next is an internal link, which refers to something on your own site. Finally, an email link is something that will allow users to easily send a message to an email address by using their default email client.

Adding An External Link

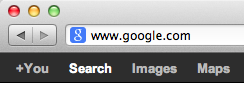
Web Address Bar

First, you’ll need to know the web address, or URL, of the page you want to link to. The URL of any webpage can be found in the URL bar of all browsers. In this image, the address in the URL bar is www.google.com. Select everything in the URL bar and copy it.

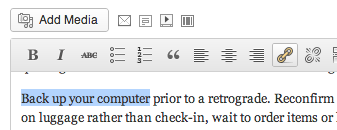
Select Text To Make Hyperlink

Next, select the text you want the user to click on. This is where you’re going to insert the link. Click on the chain-link icon, after you’ve highlighted some text.

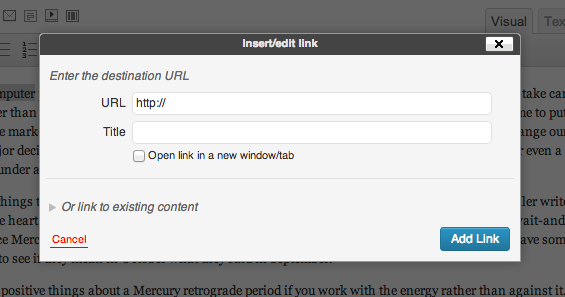
Hyperlink Lightbox

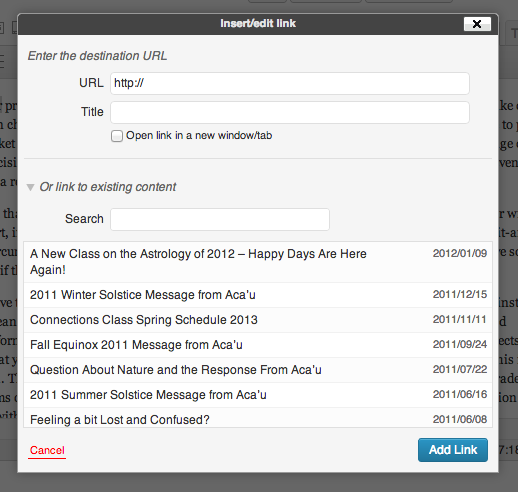
After clicking on the chain-link icon, a small window will appear. It’s called a “lightbox”. In the URL field, paste the text that you copied from the browser’s URL bar. If you selected some text before clicking the chain-link icon, you shouldn’t need to enter anything for the Title field. Finally, by default, when a visitor clicks on a link, the visitor leaves your page and gets redirected to whatever webpage the URL points to. If you want the visitor’s browser to open a new window or tab for the linked webpage, instead of leaving your site, then click the “Open link in a new window/tab” checkbox. Finally, click on the blue “Add Link” button at the bottom of the lightbox window.

Adding An Internal Link

Select Text To Make Hyperlink

Just like before, select the text you want the visitor to click on and click the chain-link icon.

Link Existing Content

This time, click on the gray triangle next to “Or link to existing content” to reveal publications on your own website. You can use the search bar to quickly find what you’re looking for. When you’ve found the page you want to link to, click on it. Again, decide if you want to click on the “Open link in a new window/tab” checkbox. Finally, click on “Add Link”.

Adding An Email Link

Select Text To Make Hyperlink

Once more, select some text from a Page or Post. Click the chain-link icon.

Create Email Link

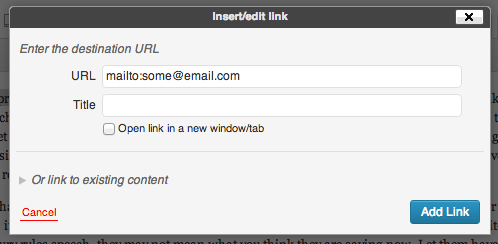
Delete the “http://” text in the URL field. Instead, replace it with “mailto:”, followed by an email address. The “Open link in a new window/tab” checkbox doesn’t matter in this case. Just click “Add Link” and you’ll be done.

Sample Widget Logic Codes

The Widget Logic plugin enables you to place widgets on some pages but not others.

<more story about how it works>

Here are some examples:

For xs.com

Company Menu

global $post; return (is_page('company') || in_array(69,get_post_ancestors($post)));

XS Administration menu

global $post; return (is_page('xs-administration') || in_array(2186,get_post_ancestors($post)));

XWS Dev menu

global $post; return (is_page('xws-development-resources') || in_array(2077,get_post_ancestors($post)));

For nlpco.com

What is NLP? sidebar widget. Only on the front page and the “What is NLP?” page.

is_front_page() || is_page('what-is-nlp')

Howto: Embed YouTube Videos Without “Suggested Videos”

Embedding YouTube videos without the “suggested videos” ending is simple and doesn’t require any credentials because YouTube allows anyone to omit the ending. Videos without suggestions at the end will simply revert to the state they were in before they were played.

Find The Video You Want

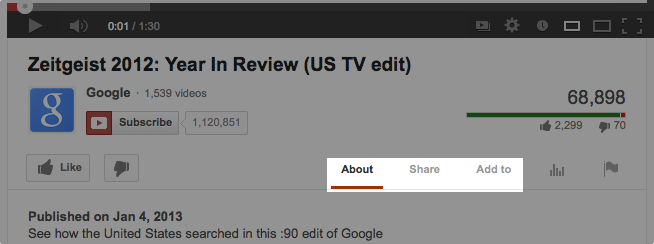
First, navigate to the YouTube page that contains the video you want to embed. At the time of writing this article, a YouTube video’s page has the following layout. The area of interest here is the options to the right of the like buttons.

YouTube Layout 25-01-13


Deselect The Suggested Videos Option

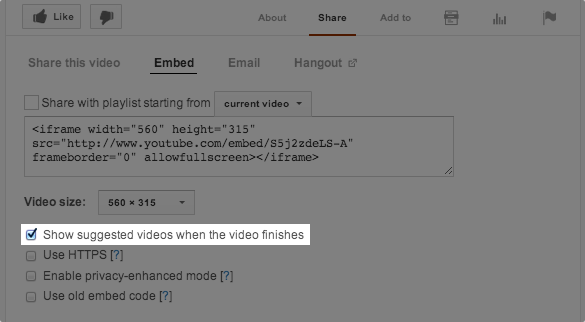
Click on Share. That’ll reveal the following set of options. Finally, uncheck the box that enables suggestions at the end of videos.

Deselect Suggestions From YouTube Videos

Howto: Take a dev site live

See also “How to configure settings on a new live site”.

Main steps

  • Ensure you have enough disk space
  • Backup live site – full backup
  • Backup dev site – full backup
  • Reconfigure live site to now be “old” ( LIVE ==> OLD)
  • Reconfigure dev site to now be “live” (DEV ==> LIVE)
  • Migrate the backup of the dev site to a new dev site. (dev backup ==> DEV)

For this how to, assume the domain is examplesite.com. So you’re moving examplesite.com (or www.examplesite.com) to old.examplesite.com, dev.examplesite.com to examplesite.com, and creating a new dev.examplesite.com from the backup.

Ensure you have enough disk space

When you’re done you’ll have 3 sites instead of 2, so you’ll need more disk for the 3rd install. You’ll also need space for the full backups.

Backup live site

Standard BuB full backup. If BuB is not available, use another backup solution. How important this is depends on how important having the old site available is.

Backup dev site

Standard BuB full backup.

  1. WP > BackupBuddy > Backup > Complete Backup
  2. Download to your workstation
  3. WP > BackupBuddy > Migrate Restore > Download the importbuddy.php script.

Reconfigure live site to now be “old”

The exact order of march here is not clear yet. I’m still experimenting with the steps, and what’s easiest, fastest, etc.

Cases:

  1. Current live site is a WordPress site installed in public_html
  2. Current live site is a WordPress site installed in a subfolder
  3. Current live site is a static HTML/CSS site
  4. Current live site is on some other platform

Case 1: WordPress site installed in public_html

  1. Log in to the WordPress live site.
  2. Log in to cPanel for the hosting account.
  3. cPanel > create subdomain old
  4. cPanel > create an index.html in public_html saying something like “Site down for maintenance.”
  5. cPanel > Copy (not move) the WP install files and folders to the new /old/ folder
  6. WP > Settings > General: Change settings for  WordPress URL and Site address to old.examplesite.com.
  7. When you save changes, you’ll no longer be logged in. You should get a login screen with the new URL.
  8. Log back in.
  9. If everything is working old.examplesite.com should be running. Navigate to old.examplesite.com and see if the front end is visible.
  10. Navigate to examplesite.com. It should show the “Site down for maintenance” page.
  11. Assuming the old.examplesite.com is working, go back to cPanel File Manager and delete the WP install from /public_html/
  12. You’re done with this step.

Case 2: WordPress site installed in a subfolder

<Revise above to handle this case. After creating subdomain, move or copy files from /xx/ to /old/; more mods>

Case 3: Static HTML/CSS site

<Revise above. Probably a little simpler, except for identifying the install files>

Case 4: Some other platform

We have no info here. It depends on platform. Add additional cases as they surface.

Reconfigure dev site to now be “live”

Assume the dev site is now installed in the folder called /dev/. Assume you want that folder to be called /wp/. These are the default choices if we’ve done the original installs.

NOTE: This procedure did not work for KC.com. I had to do a migrate from dev to live using import buddy. That worked fine. Rewrite this!

  1. Log in to the WordPress dev site.
  2. Log in to cPanel for the hosting account.
  3. cPanel > create an index.html in public_html saying something like “Site down for maintenance.” (Maybe this is already done in a prior step.)
  4. cPanel > File Manager: Edit index.php. (If there isn’t one there already, copy it from /public_html/dev/ to /public_html/.
    1. Scroll to the bottom of the file.
    2. Edit the ?? line to use ./wp/wp-blogheader.php instead of ./wp-blogheader.php
    3. Save index.php
  5. WP > Settings > General: Change settings for  WordPress URL and Site address
    WordPress URL -> examplesite.com/wp
    Site Address -> examplesite.com
  6. When you save changes, you’ll no longer be logged in. You may see a login screen. Don’t try to log in yet. You may see some php error messages.That’s good!
  7. cPanel > File Manager: rename index.html to be index-maintenance.html. (index.html is chosen before index.php if both exist. This hides index.html.)
  8. cPanel > File Manager: rename /dev/ to be /wp/
  9. cPanel > File Manager: create a new empty folder /dev/
  10. Browser: Navigate to examplesite.com. It should come up now.
  11. WP > Log in
  12. There are probably a bunch of broken links. Use the search and replace plugin to replace “dev.examplesite.com” with “examplesite.com”

Migrate dev site

  1. cPanel: Create a new database to hold the new dev site. (See another howto on creating an empty database.)
  2. cPanel (or FTP): Upload importbuddy.php and the backup you ran when you backed up the dev site.
  3. Navigate to dev.examplesite.com/importbuddy.php; follow directions in the wizard that appears
    1. Authenticate first. Use the importBuddy password that you set for the dev site. Our convention for XWS is “ydduB”, without the quotes.
    2. In step 1, the backup of the dev site that you uploaded should be selected already. Hit Next Step.
    3. Step 2 is file extraction. It should say that the files were extracted. Hit Next Step.
    4. Step 3. Set the database parameters that you created in step 1 above. Test the database settings. Then hit Next Step.
    5. Step 4. Migrate the site changing URLs etc. Hit Next Step.
    6. Step 5. Check out the site. If it looks ok, hit the Cleanup button.
    7. Step 6. You’re done.

Clean up

  1. Go back and clean up files that are no longer necessary.
  2. If you had to increase disk quota, go back and take it back down to what it was. Or maybe what they need now.

See also “How to configure settings on a new live site”.

Howto: Show excerpts on posts page?

Q: How do I show only excerpts on a posts page? I don’t want to show the entire post. Read More…

Turn your WordPress site into a Membership site

The folks at WordPress Wishlist have just released their Wishlist Member product. It’s a cool plugin for WordPress that adds membership features to your WordPress website. If you want to make some of your site public and some private, or want to make some content free and some available only to subscribers, or have more than one level of subscriber, or {lots more features}, you’ll want to check it out.

It’s is brand new, so I can’t give detailed feedback yet. I have purchased a multi-site license for my sites, and have joined their affiliate program. So the links to Wishlist Member that you see in this post are my affiliate links.

To learn more, visit the site. They have a nice feature list on the main page and a bunch of screencast videos that show off the features.

I’ll post more info when I’ve had a chance to actually use it.

-Denny