Secrets of Pasting Formatted Text

Over the years, we’ve learned that the WordPress WYSIWYG editor is picky.

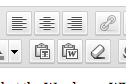
First off, to access the full glory of the editor, click the “kitchen sink” button on the right side of the editor.
KitchenSink

Now you’ll see new and exciting buttons. One of them is a lovely button that gives the illusion that you can paste text directly from Word into WordPress and maintain the formatting.

PasteFromWord
Sometimes it might even work. Sometimes (think blue moon).

But, if you don’t want to struggle with wonky code, you basically need to paste in text with very minimal formatting, really just paragraph breaks. Here are some tricks.

1) My favorite. Paste the code right into the HTML screen.
VisualHTML

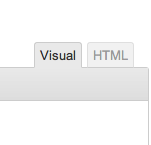
On the right side of the editing window is a tab that says HTML. I’ve discovered that if you click on the tab so that the HTML is in black and the Visual is in gray, then paste your formatted text right into that window, it strips out all the formatting but keeps all the paragraphs. This saves you from the work and frustration of other techniques.

2) The popular technique. Paste into notepad or textpad.

The most popular technique is to take your beautifully formatted document, paste it into TextEdit (Macs) or notepad (PC) and click the formatting button that makes it “plain text”, which strips out all the formatting. Then copy it from there into WordPress and add the formatting in WordPress.

3) The “bad idea” technique. Paste directly from Word and strip out rogue HTML in the HTML tag.

The idea that is most frustrating and time consuming is to go ahead and paste the formatted text from Word into the Visual editor and then go into the HTML and strip out the rogue HTML text. I’ve found that even when I’ve stripped out everything that could possibly cause problems, WordPress still gives me weird formatting and it often looks wonky.

I hope this is helpful!

How to log in

You must log in to the administrative section of your site in order to make changes to your site. The admin section is also known as the “back end” or “dashboard”. The “front end” is what your visitors see. The “back end” is where you make changes to what your visitors see.

The URL to login to your back end is http://domain-name.com/wp-admin. You probably want to bookmark that link.

You will be presented with a login screen. Enter your username and password and select the “Login” button.

If you forget your password, use the “Lost your password?” link, and follow the directions.

After logging in, you will be at the “Dashboard” screen.

At the top of your browser window (below the tabs or title bar), is a black navigation bar with links to some of the common things you will do on your site. For example, the New menu item has a drop-down menu that enables you to create new items of various kinds.

On the left of your browser wind is a comprehensive navigation bar containing links to all of the things you can do within your version of WordPress. When you change themes or plugins, that navigation bar will also change.

HowTo: Create a Signup Form for a WordPress website

Prerequisite: You must have at least one list defined.

Things to think about before you start:

  • Do you want a small, compact form that lives in a sidebar (e.g., home page) or a link in the sidebar to a more elaborate form (e.g., home page, and signup form).

When you’re ready…

  1. Go to lists > create forms.
  2. Select the list you want to associate with this Signup Form
  3. Select the build it tab.
  4. Select Signup Form from the forms and response emails dropdown.
  5. Add and delete fields to get the fields you want on your form.
  6. Select create embed code for a small form

If you are doing a sidebar form:

  1. Select either include only required fields or include all fields depending on which fields you want visible.
  2. Uncheck include form label. You probably want to use a sidebar widget in WordPress with its own styling.
  3. Decide on whether you want the include required fields notice or not
  4. You probably don’t want include interest groups in this version.
  5. Leave set form width empty. The sidebar widget sizes things properly.
  6. Leave the rest alone, probably. Although you might want “include subscriber count chicklet.”
  7. Click on create embed code.
  8. Copy the code in the copy/paste into your site box.
  9. Go to WordPress admin for your site > Appearance > Widgets.
  10. Drag a text widget to where you want to install it.
  11. Paste the embed code into the text box.
  12. Add a title such as “Subscribe to our mailing list.”

Howto: Turn on self registration with reCaptcha

Protect yourself from ‘bots self-registering by adding a reCaptcha element to the registration page.

  1. Get the reCaptcha keys you will need below from the XWS Dev site. (You probably have to log in to the XWS Dev site to see this.)
  2. Log in as an administrator on the site you’re trying to protect.
  3. On the home page, go to Users > Authentication > Manage authentication.
    1. Make sure Email-based self-registration is enabled.
    2. Scroll to the bottom of that page and enter the two reCaptcha keys.
    3. Save changes.
  4. Click the Settings link on that line.
  5. On the Email-based self-registration page:
    1. Enable reCaptcha element. Set to Yes.
    2. Save changes.

Howto: Turn on RSS in Moodle

RSS is off by default in Moodle sites. To turn it on requires (at least) three levels:

  • Server level
  • Module level
  • Individual resource level

At the Server level:

  • Admin > Server > RSS. Turn on RSS globally.
    This doesn’t activate anything; it just makes it possible to do so below.

At the Module level:

  • For each module type (e.g. Forums) that wants to use RSS:
  • Admin > Modules > Activities > Forum. Turn on RSS for that type of module.
    Again, this doesn’t activate anything; it just makes it possible to do so below.

At the individual resource level:

  • For each resource that wants to use RSS:
  • Go to the resource (e.g., go to a particular forum)
  • "Update this forum" button
  • In the RSS section, set RSS feed to "Discussions" if you want posts and comments. Set to "Posts" if you want only posts to be in the feed.
  • Set # recent parameter to how many items are in the feed. 5 is common; 10 is common. More for a very active resource.

Howto: Configure security, administrators, course creators

Header

Set up initial administrators and course creators:

  • Log in as the original administrator created when you installed Moodle.
  • Create initial users. These should be people who will help configure and build the site. Don’t rely on the original administrator to be the only one.
  • Go to Users > Permissions > Assign system roles.
  • Assign Admin privs to those initial users who should be site-wide admins.
  • Assign Creator privs to those initial users who will be creating courses.

Check the security settings:

  • Go to Security > Site Policies
    The default site policies are OK for many sites. Check the following:

    • Open to Google?
    • Maximum upload file size?
    • Site policy page?
      You might want to create a page that defines the agreement with your users. Set the URL here.
    • Set password policy?
      You might want to require that users have “strong” passwords.
  • Go to Security > HTTP Security
    You might want to make the login page secure with https. Read the warning, however.
  • Go to Security > Notifications
    If you want to be notified when users have problems logging in, set these parameters.

Howto: Configure a new Moodle site

Here’s a checklist of things to do, or at least consider, when you create a new Moodle site.

Decide where to install the copy of Moodle. Either top-level of the site (i.e., the entire site is Moodle-based) or in a sub-folder (i.e., Moodle is only part of the entire site.) If sub-folder, choose a name for the folder to be used as part of the url of the site. (e.g., courses, moodle, learn)

Use Fantastico to install Moodle.

  • Leave “folder” empty if you want top-level. Use folder name if you want it in a sub-folder.
  • Use admin as the username for the original admin user. First name “Admin” and last name “Istrator.” Choose a good password.
  • Use a special “admin” email address.
  • Use “Slogan here” and “Description here” for those boxes.
  • Run the cron job at 30 minutes.
  • <MORE?>

In cpanel>File Manager:

  • Create a /moodledata/ folder outside public_html.
  • Edit config.php. If you moved anything, edit the paths. In particular, change the uploaddata path to the new/moodledata/ folder.

Log in to Moodle as admin.

Install en-us language pack.

  • Site Administration > Language > Language packs, select English (en-us), and click install.
  • Site Admin > Language > Language settings and select en-us as the Default language.
  • While on that screen, decide if you want to display a language menu or not.

Create initial users. I like to leave Admin alone, so in case something gets messed up you can go back to the original to get things working again.

  • Site Administration > Users > Accounts > Add a new user.
  • Do this for all of the initial users you want to set up.

Make some of the users site-wide Admins.

  • Site Admin > Users > Permissions > Assign system roles.
  • Select the users you want to promote to site wide Admin status. These users can do anything on the site.

Make moodledata not accessible via the web.

  • In an FTP client, move /public_html/uploaddata/ to top level, i.e., same level as public_html.
  • Edit config.php to change the “dataroot” parameter to point to the new location.

Fix php parameters for Moodle.

  • Go to Site Admin > Notifications.
    It will tell you to set register_globals and display_errors to off.
  • Use cPanel > Software/Services > php.ini EZconfig to change these.

Clear Nnotifications.

  • When the rest of the Notifications have been cleared (e.g., after HG support has fixed the php parameters), register the site to remove the button on the notifications page.

Change the timeout.

I think the default timeout is too short.
{Tell how to change it here.}

(Optional) Turn on RSS capability.

If you want RSS on any part of the site, there are 3 levels to deal with. You might have to change many settings to make each level work.

  1. The default setting is that RSS is off for the entire site. To turn on the possibility of using RSS: go to Administration > Server > RSS and turn on the global default. This doesn’t create any RSS feeds, it just makes it possible to do so.
  2. The default setting for all activities is to have RSS off. For example, the default for Forums is to have it off. To turn on the possibility that some Forum might have an RSS feed: go to Administration > Modules > Activities > {the activity you want to RSS-enable; e.g., Forum} and turn on the default for this activity. You might have to do this for more than just Forums. This also doesn’t create any RSS feeds, it just makes it possible to do so.
  3. The default setting for each instance of an Activity (e.g., a particular Forum) is to have RSS off. To turn on an RSS feed for a particular forum: Go to the particular forum; select the “Update this forum” button. In the RSS section, set RSS feed to “Discussions.” (This turns on both posts and replies/comments. Another option is “Posts” which only sends new posts to the feed.) Set the # of recent entries to the number you want displayed in this feed. I usually use 5. 10 is also reasonable. More if your forum is very active and your users want a longer time slice.

<More standard things to do ?>

Choose registration method

Minimize spam

Admin settings for reducing spam

Start with the article in docs: http://docs.moodle.org/en/Reducing_spam_in_Moodle

Add more ideas here…

Howto: Move course from one site to another

Notes on moving a moodle course from one site to another.

For example, I’m moving Antiques 2007 from xsfor.us to antiquesbaseball.com.

Initial Setup

  1. FFox: Open this set of instructions in one window.
  2. Finder: Nav to a folder to contain the backup downloads.
  3. Interarchy: Open the old site’s bookmark. Nav to /moodledata/.
  4. FFox: Open the old site’s home page in a second window. Log in as an Administrator.
  5. FFox: Open the new site’s home page in a third window. Log in as an Administrator.

Move course(s)

  1. Log in to the old site as an administrator.
  2. Backup the course you’re moving.
    Select "all" info. (You can skip logs.)
  3. Use an ftp program to download the .zip file to your workstation.
    My convention: Site Archives > XWS > {new site folder}
  4. Log in to the new site as an administrator.
  5. Create an Empty course if there isn’t one there already.
  6. Open the Empty course.
  7. In the Administration block, click the Restore link.
  8. During the restore process you can replace the existing course or create a new course. Use new course; we made the dummy course so you could restore many old courses.

List of Moodle sites managed by XWS

URLCustomerSite typeTierMoodleThemeNotesUpdate sort
http://www.xsfor.us/XS xsfor.usold21.9.2Custom corners xs3
http://sandbox.xsfor.us/moodle/XS sbx.xsfor.ussbx31.9.2standardwhitex
http://sandbox.expertwebsupport.com/moodle/XS sbx.xws.comsbx31.9.2standardwhitex
http://courses.expertwebsupport.com/XS courses.xws.comold21.9.2Custom corners xs1
http://courses.guide4growth.com/XS courses.g4g.comlive21.9.2standardwhite2
http://www.nlpco.com/learn/NLPCO /learn/live11.9.4standardwhite8
http://old.antiquesbaseball.com/DPB old.abc.comold31.9.4Custom corners6
http://julianteachings.com/courses/Julian Teachingslive11.9.8Custom corners xs7
asepco.usAsepco asepco.uslive11.9.7Custom corners5
BPETGAsepco bpetglive11.9.4Metal4